This is done by logging in as the root user to your XenServer system via SSH. To see the PCI devices available to your system, enter the following command:
lspci
Here is an example result:
00:00.0 Host bridge: Advanced Micro Devices, Inc. [AMD/ATI] RD890 Northbridge only dual slot (2×16) PCI-e GFX Hydra part (rev 02)
00:00.2 IOMMU: Advanced Micro Devices, Inc. [AMD/ATI] RD990 I/O Memory Management Unit (IOMMU)
00:02.0 PCI bridge: Advanced Micro Devices, Inc. [AMD/ATI] RD890 PCI to PCI bridge (PCI express gpp port B)
00:09.0 PCI bridge: Advanced Micro Devices, Inc. [AMD/ATI] RD890 PCI to PCI bridge (PCI express gpp port H)
00:0a.0 PCI bridge: Advanced Micro Devices, Inc. [AMD/ATI] RD890 PCI to PCI bridge (external gfx1 port A)
00:0b.0 PCI bridge: Advanced Micro Devices, Inc. [AMD/ATI] RD890 PCI to PCI bridge (NB-SB link)
00:0c.0 PCI bridge: Advanced Micro Devices, Inc. [AMD/ATI] RD890S PCI Express bridge for GPP2 port 1
00:11.0 SATA controller: Advanced Micro Devices, Inc. [AMD/ATI] SB7x0/SB8x0/SB9x0 SATA Controller [AHCI mode]
00:12.0 USB controller: Advanced Micro Devices, Inc. [AMD/ATI] SB7x0/SB8x0/SB9x0 USB OHCI0 Controller
00:12.1 USB controller: Advanced Micro Devices, Inc. [AMD/ATI] SB7x0 USB OHCI1 Controller
00:12.2 USB controller: Advanced Micro Devices, Inc. [AMD/ATI] SB7x0/SB8x0/SB9x0 USB EHCI Controller
00:13.0 USB controller: Advanced Micro Devices, Inc. [AMD/ATI] SB7x0/SB8x0/SB9x0 USB OHCI0 Controller
00:13.1 USB controller: Advanced Micro Devices, Inc. [AMD/ATI] SB7x0 USB OHCI1 Controller
00:13.2 USB controller: Advanced Micro Devices, Inc. [AMD/ATI] SB7x0/SB8x0/SB9x0 USB EHCI Controller
00:14.0 SMBus: Advanced Micro Devices, Inc. [AMD/ATI] SBx00 SMBus Controller (rev 3d)
00:14.1 IDE interface: Advanced Micro Devices, Inc. [AMD/ATI] SB7x0/SB8x0/SB9x0 IDE Controller
00:14.3 ISA bridge: Advanced Micro Devices, Inc. [AMD/ATI] SB7x0/SB8x0/SB9x0 LPC host controller
00:14.4 PCI bridge: Advanced Micro Devices, Inc. [AMD/ATI] SBx00 PCI to PCI Bridge
00:14.5 USB controller: Advanced Micro Devices, Inc. [AMD/ATI] SB7x0/SB8x0/SB9x0 USB OHCI2 Controller
00:18.0 Host bridge: Advanced Micro Devices, Inc. [AMD] Family 15h Processor Function 0
00:18.1 Host bridge: Advanced Micro Devices, Inc. [AMD] Family 15h Processor Function 1
00:18.2 Host bridge: Advanced Micro Devices, Inc. [AMD] Family 15h Processor Function 2
00:18.3 Host bridge: Advanced Micro Devices, Inc. [AMD] Family 15h Processor Function 3
00:18.4 Host bridge: Advanced Micro Devices, Inc. [AMD] Family 15h Processor Function 4
00:18.5 Host bridge: Advanced Micro Devices, Inc. [AMD] Family 15h Processor Function 5
00:19.0 Host bridge: Advanced Micro Devices, Inc. [AMD] Family 15h Processor Function 0
00:19.1 Host bridge: Advanced Micro Devices, Inc. [AMD] Family 15h Processor Function 1
00:19.2 Host bridge: Advanced Micro Devices, Inc. [AMD] Family 15h Processor Function 2
00:19.3 Host bridge: Advanced Micro Devices, Inc. [AMD] Family 15h Processor Function 3
00:19.4 Host bridge: Advanced Micro Devices, Inc. [AMD] Family 15h Processor Function 4
00:19.5 Host bridge: Advanced Micro Devices, Inc. [AMD] Family 15h Processor Function 5
00:1a.0 Host bridge: Advanced Micro Devices, Inc. [AMD] Family 15h Processor Function 0
00:1a.1 Host bridge: Advanced Micro Devices, Inc. [AMD] Family 15h Processor Function 1
00:1a.2 Host bridge: Advanced Micro Devices, Inc. [AMD] Family 15h Processor Function 2
00:1a.3 Host bridge: Advanced Micro Devices, Inc. [AMD] Family 15h Processor Function 3
00:1a.4 Host bridge: Advanced Micro Devices, Inc. [AMD] Family 15h Processor Function 4
00:1a.5 Host bridge: Advanced Micro Devices, Inc. [AMD] Family 15h Processor Function 5
00:1b.0 Host bridge: Advanced Micro Devices, Inc. [AMD] Family 15h Processor Function 0
00:1b.1 Host bridge: Advanced Micro Devices, Inc. [AMD] Family 15h Processor Function 1
00:1b.2 Host bridge: Advanced Micro Devices, Inc. [AMD] Family 15h Processor Function 2
00:1b.3 Host bridge: Advanced Micro Devices, Inc. [AMD] Family 15h Processor Function 3
00:1b.4 Host bridge: Advanced Micro Devices, Inc. [AMD] Family 15h Processor Function 4
00:1b.5 Host bridge: Advanced Micro Devices, Inc. [AMD] Family 15h Processor Function 5
01:01.0 VGA compatible controller: ASPEED Technology, Inc. ASPEED Graphics Family (rev 10)
01:03.0 Multimedia audio controller: C-Media Electronics Inc CMI8788 [Oxygen HD Audio]
02:00.0 Ethernet controller: Intel Corporation 82574L Gigabit Network Connection
03:00.0 Multimedia controller: Philips Semiconductors SAA7164 (rev 81)
04:00.0 Ethernet controller: Intel Corporation 82574L Gigabit Network Connection
05:00.0 Ethernet controller: Intel Corporation 82574L Gigabit Network Connection
06:00.0 InfiniBand: Mellanox Technologies MT26418 [ConnectX VPI PCIe 2.0 5GT/s – IB DDR / 10GigE] (rev b0)
As you might guess from some of the lines, it’s an AMD server. You’ll notice some USB controllers, likely a SATA controller and any PCI or PCI Express add-in cards (usually at the bottom). In this example we will pass through a digital TV card to a VM so we can record free-to-air TV. The controller here is the fourth-last entry:
03:00.0 Multimedia controller: Philips Semiconductors SAA7164 (rev 81)
It’s a Digital Now PCI-E card – as you can see there’s no mention of the brand in the chipset that the system can see, so you may have to make an educated guess (or do some research as to what’s actually used in the card) to determine which one you want. Making note of the above line, we now edit /boot/extlinux.conf:
vi /boot/extlinux.conf
In our example system it looks like this:
# location mbr
serial 0 115200
default xe
prompt 1
timeout 50
label xe
# XenServer
kernel mboot.c32
append /boot/xen.gz mem=1024G dom0_max_vcpus=4 dom0_mem=4096M,max:4096M watchdog_timeout=300 lowmem_emergency_pool=1M crashkernel=64M@32M cpuid_mask_xsave_eax=0 console=vga vga=mode-0x0311 — /boot/vmlinuz-2.6-xen root=LABEL=root-ckwntldj ro xencons=hvc console=hvc0 console=tty0 quiet vga=785 splashi — /boot/initrd-2.6-xen.img
label xe-serial
# XenServer (Serial)
kernel mboot.c32
append /boot/xen.gz com1=115200,8n1 console=com1,vga mem=1024G dom0_max_vcpus=4 dom0_mem=4096M,max:4096M watchdog_timeout=300 lowmem_emergency_pool=1M crashkernel=64M@32M cpuid_mask_xsave_eax=0 — /boot/vmlinuz-2.6-xen root=LABEL=root-ckwntldj ro console=tty0 xencons=hvc console=hvc0 — /boot/initrd-2.6-xen.img
label safe
# XenServer in Safe Mode
kernel mboot.c32
append /boot/xen.gz nosmp noreboot noirqbalance acpi=off noapic mem=1024G dom0_max_vcpus=4 dom0_mem=4096M,max:4096M com1=115200,8n1 console=com1,vga — /boot/vmlinuz-2.6-xen nousb root=LABEL=root-ckwntldj ro console=tty0 xencons=hvc console=hvc0 — /boot/initrd-2.6-xen.img
label fallback
# XenServer (Xen 4.1.5 / Linux 2.6.32.43-0.4.1.xs1.8.0.835.170778xen)
kernel mboot.c32
append /boot/xen-4.1.5.gz mem=1024G dom0_max_vcpus=4 dom0_mem=4096M,max:4096M watchdog_timeout=300 lowmem_emergency_pool=1M crashkernel=64M@32M cpuid_mask_xsave_eax=0 — /boot/vmlinuz-2.6.32.43-0.4.1.xs1.8.0.835.170778xen root=LABEL=root-ckwntldj ro xencons=hvc console=hvc0 console=tty0 — /boot/initrd-2.6.32.43-0.4.1.xs1.8.0.835.170778xen.img
label fallback-serial
# XenServer (Serial, Xen 4.1.5 / Linux 2.6.32.43-0.4.1.xs1.8.0.835.170778xen)
kernel mboot.c32
append /boot/xen-4.1.5.gz com1=115200,8n1 console=com1,vga mem=1024G dom0_max_vcpus=4 dom0_mem=4096M,max:4096M watchdog_timeout=300 lowmem_emergency_pool=1M crashkernel=64M@32M cpuid_mask_xsave_eax=0 — /boot/vmlinuz-2.6.32.43-0.4.1.xs1.8.0.835.170778xen root=LABEL=root-ckwntldj ro console=tty0 xencons=hvc console=hvc0 — /boot/initrd-2.6.32.43-0.4.1.xs1.8.0.835.170778xen.img
Rather an intimidating-looking file if you’re new to *nix config files. Fortunately, we can ignore most of this and just pay attention to the last line in the “label xe” section at the top. The line we want to edit is:
append /boot/xen.gz mem=1024G dom0_max_vcpus=4 dom0_mem=4096M,max:4096M watchdog_timeout=300 lowmem_emergency_pool=1M crashkernel=64M@32M cpuid_mask_xsave_eax=0 console=vga vga=mode-0x0311 — /boot/vmlinuz-2.6-xen root=LABEL=root-ckwntldj ro xencons=hvc console=hvc0 console=tty0 quiet vga=785 splashi — /boot/initrd-2.6-xen.img
Looking at the line we wanted from lspci above, we want the number at the front – in this case:
03:00.0
Add the following near the end of the config line – inbetween “splashi” and “—“:
pciback.hide=(03:00.0)
The line should now read:
append /boot/xen.gz mem=1024G dom0_max_vcpus=4 dom0_mem=4096M,max:4096M watchdog_timeout=300 lowmem_emergency_pool=1M crashkernel=64M@32M cpuid_mask_xsave_eax=0 console=vga vga=mode-0x0311 — /boot/vmlinuz-2.6-xen root=LABEL=root-ckwntldj ro xencons=hvc console=hvc0 console=tty0 quiet vga=785 splashi pciback.hide=(03:00.0) — /boot/initrd-2.6-xen.img
Note the space on either side – one between splashi and the new text and one between the hyphens and the new text. Now run:
extlinux -i /boot
Then shut down any VMs and reboot the server:
reboot
Once it is back up, we need to find the UUID of the virtual machine we want to pass the device through to. Run:
xe vm-list
This will return a result for every VM on the system – it might be quite long! If it is a long list you may wish to pipe it to the less command for easier viewing:
xe vm-list | less
If you aren’t familiar with less you can exit with the “q” key. Sort through the list until you find the VM you want to pass through to. In this example it is:
uuid ( RO) : 6b664553-6822-b445-5a8c-c10d93c41c4c
name-label ( RW): bacchus
power-state ( RO): halted
Now we can add the PCI device to the config of this VM:
xe vm-param-set other-config:pci=0/0000:03:00.0 uuid=6b664553-6822-b445-5a8c-c10d93c41c4c
Breaking that down:
xe vm-param-set other-config:pci=0/0000:[PCI address for the device] uuid=[UUID of VM]
Starting the VM – in this case a Windows 7 VM – we can check for the device to see that it has appeared (in this case the drivers were already installed so it has been immediately identified):
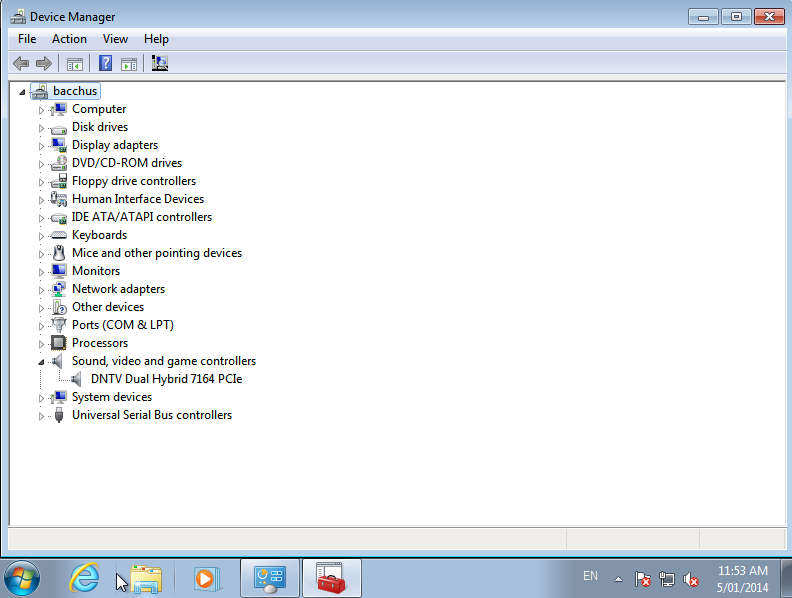
Success! In a Linux system you should be able to do:
lspci
to see the newly passed through hardware.

 Click “Add New”.